Run an Analysis
This guide walks you through the complete process of running a federated analysis using the Five Safes TES reference implementation. It covers setting up the environment, configuring connections to TREs (Trusted Research Environments), submitting analysis jobs, and retrieving aggregated results.
It demonstrates running a basic statistical analysis (mean calculation) on measurement values from OMOP Concept “Airway resistance —during inspiration” across multiple TREs.
This guide is expected to take approximately 45 minutes to complete with the assumptions that you have already set up the Five Safes TES reference implementation environment and configured the connections between the Submission Layer and TREs with associated Funnel instances.
Requirements
Software Prerequisites
- Python (3.10 or later)
- Poetry (optional, 1.8.0 recommended)
Infrastructure Prerequisites
- Deployed Five Safes TES DemoStack Quickstart or one Submission Layer and at least one TRE Agent with Funnel connected to the agent.
- OMOP CDM database connected to each TRE. You can use
omop-litefor a quickstart synthetic OMOP CDM.
While using omop-lite to create a synthetic OMOP CDM database, OMOP CDM’s
schema name should be in lowercase as common naming convention.
Information Prerequisites
- Submission Layer endpoint and API Token which can be obtained by this guide.
- Submission Layer S3 storage endpoint.
- Database host and credentials for each TRE
Setup
There will be two setups: One on the “Researchers”, who want to send the analysis request to the TREs, side and one on the “TRE” side, who want to receive the analysis request and run the analysis.
TRE side setup
Locate the .env file
- If you are using the
DemoStack Quickstart, the.envfile is located in theDemoStackdirectory. - If you are using separate Submission Layer and TRE, the
.envfile is located in theTREdirectory.
Edit the .env file
Edit the .env file to update the environment variables about the TRE DB credentials.
# TRE DB Credentials
TRE_DATA_SERVER=<TREDBHost>
TRE_DATA_PORT=<TREDBPort>
TRE_DATA_DATABASE=<TREDBDatabase>
TRE_DATA_USER=<TREDBUser>
TRE_DATA_PASSWORD=<TREDBPassword>
Change these variables to the actual values of the TRE DB where the OMOP CDM is stored.
Update the DMN rules
Login to the TRE Layer UI and navigate to the “DMN Rules” section. This page helps to set the values which are used by the Executor (e.g., Funnel) to connect to the TRE DB.
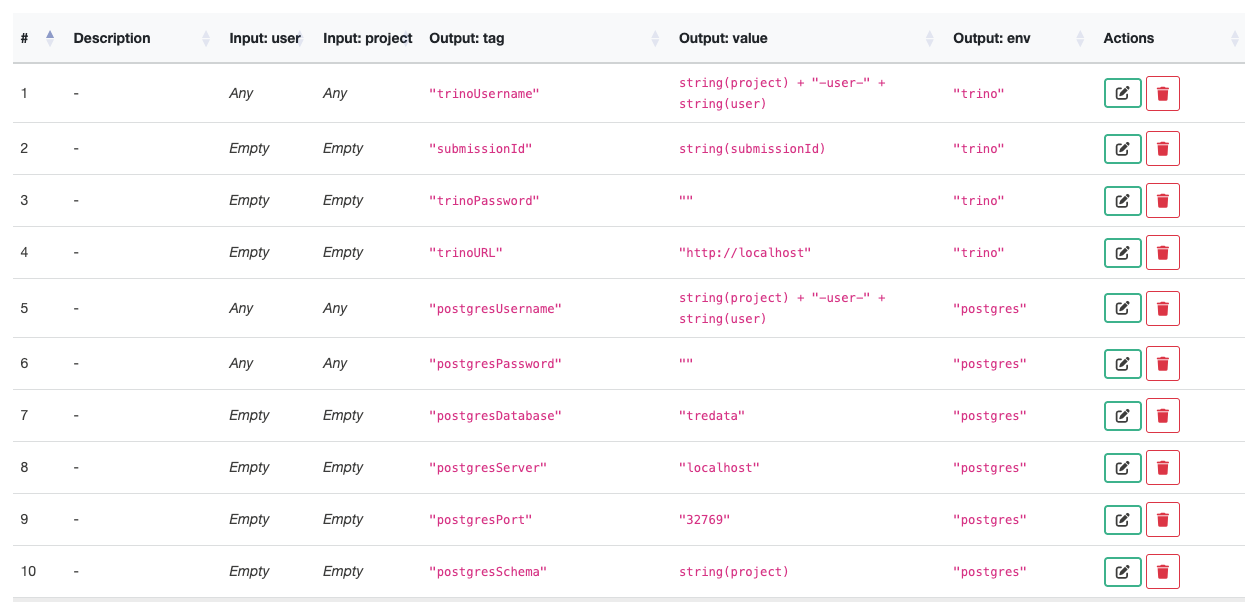
Find the rules with the following tags and change them to the correct values of the TRE DB credentials.
| Output:tag | Output:value |
|---|---|
| postgresDatabase | ”change to the TREDBDatabase above” |
| postgresServer | ”change to the TREDBHost above” |
| postgresPort | ”change to the TREDBPort above” |
| postgresSchema | ”change to the schema of the OMOP CDM in TRE DB” |
Notices:
- The values put into
Output Valueshould be inside double quotes. - You don’t need to put any value into
postgresPasswordtag. - The value of
postgresUsernamecan be kept unchanged. - The value of
postgresSchemais defaulted to the project name in the Submission Layer. But if the OMOP CDM is under a different schema, you need to change the value to the actual lowercase schema name.
Researchers side setup
Clone the repository
Clone the repository from here: https://github.com/Health-Informatics-UoN/Five-Safes-TES-Analytics
git clone https://github.com/Health-Informatics-UoN/Five-Safes-TES-Analytics.gitInstall dependencies
Using Poetry is recommended. Run the command:
poetry installAlternatively, you can use pip with the requirements file:
pip install -r requirements.txtEdit the env.example of Five-Safes-TES-Analytics repository
Edit the env.example file of Five-Safes-TES-Analytics repository to update the environment variables.
The example file has placeholders for all the relevant details which described in the table below. They are all required.
# Authentication
5STES_TOKEN=<AccessToken>
5STES_PROJECT=<ProjectName>

# TRE Configuration
5STES_TRES=<ListOfTargetTREs>

# TES (Task Execution Service) Configuration
TES_BASE_URL=http://<SubmissionLayerAPIHost>:<SubmissionLayerAPIPort>/  # Host and Port of the Submission Layer API
TES_DOCKER_IMAGE=harbor.ukserp.ac.uk/dare-trefx/control-tre-sqlpg:2.15.1

# MinIO Configuration
MINIO_STS_ENDPOINT=http://<SubmissionLayerMinIOHost>:9000/sts
MINIO_ENDPOINT=<SubmissionLayerMinIOHost>:9000
MINIO_OUTPUT_BUCKET=<SubmissionLayerMinIOOutputBucketName>

# SQL Query Configuration
SQL_SCHEMA=public
Description of the variables:
| Key | Description |
|---|---|
5STES_TOKEN | The token to access the Submission Layer API. Can be obtained by this
guide. This will expire after the |
5STES_PROJECT | The project name created in the Submission Layer and approved by the TRE. Follow this guide to create a project, and this guide to approve the project. |
5STES_TRES | The list of target TREs to run the analysis on, separated by commas. |
TES_BASE_URL | The host and port of the Submission Layer API. |
TES_DOCKER_IMAGE | The Docker image to run for an analysis task on the TREs’ Database. For
the demo purpose, we are using the
|
MINIO_STS_ENDPOINT MINIO_ENDPOINT | The host and port of the Submission Layer’s MinIO. Add /sts to the end of the host to get the STS endpoint. |
MINIO_OUTPUT_BUCKET | The name of the bucket to store the analysis results in the Submission Layer’s MinIO. Find this by clicking on the “Output Bucket” button in the About section of the Project in Submission Layer UI and copying the bucket name in Minio Browser. |
SQL_SCHEMA | The database schema name where the OMOP CDM is stored and the analysis will
be running with the query (named as Default is |
There may be an error if there is no data in the TRE DB that matches the query. In this case, you need to change the query to a different one that queries the data exists in the TRE DB.
Run an analysis
This runs the basic default demo, which will calculate means of measurement values with a particular OMOP Concept: “Airway resistance” 21490742.
Run analysis_engine.py.
Using poetry, the command is:
poetry run python analysis_engine.pyReview submission details.
The terminal will give updates on the submission status from the Python script. The Submission GUI will give more details under the submissions tab.
Wait.
Check the status
When the processing is complete, the status in the Submission layer will change to waiting for egress. This means that the analysis has been processed and needs to be approved before the results can leave the TREs.
Approve/deny egress requests
Acting as the TREs, access the Egress control(s) and approve (or deny) the egress.
The default behaviour is to complete the analysis with the results given, even if one or more TREs don’t provide results. Once they have been approved, the status in both the submission layer GUI and the terminal will be updated the next time it polls.
If the analysis is approved later than the Expires time of the token, the
process will fail. You then will need to get a new token and run the analysis
again.
Fetch partial results
The partial results from each TRE will be fetched automatically.
Aggregate results
The partial results will be aggregated and return the final result to the terminal.
Next steps
The next step is to run a different analysis on a different subset of data.
The general way to use the tool is to use it in a Python environment rather than running from the terminal.
The data selection is done with an SQL query. This is simply to select a subset of data to run the analysis on. Change the user query to select the data you want to run the analysis on.
Supported analysis types are currently mean, variance, PMCC, chi_squared_scipy and chi_squared_manual.
Once the analysis is completed, the aggregated data is stored in the engine, and the analysis, or related analyses, can be repeated without further queries to the TREs.