Five Safes TES Developer Guide
This guide provides a step-by-step overview for developers to set up and run the Five Safes TES reference implementation in a local development environment.
This project is split across two repositories:
-
DARE-Control: This repository contains the source code for the Five Safes TES Application GitHub.
-
5S-TES-Deployment: This repository contains the Docker Compose stack and deployment configurations used to run the platform locally or in production GitHub.
When a pull request is approved and merged into the main branch of the DARE-Control repository, the updated application code is automatically applied when running the project with Docker Compose through the 5S‑TES‑Deployment repository..
To run the Five Safes TES stack for local development, you must have both the DARE-Control and 5S-TES-Deployment repositories cloned.
Prerequisites
This project requires .NET SDK versions 8.0 to be installed.
Repository Structure
This section provides a high level overview of the repository structure, along with the information you need to understand how the Dare-Control stack is organised and how it runs locally.
swanseauniversitymedical-dare-control/
├── Camunda-docker/
├── charts/
├── DARE-Control-Docker/
...
├── src/
│   ...
│   ├── DARE-API/
│   ├── DARE-FrontEnd/
│   ├── Data-Egress-API/
│   ├── Data-Egress-UI/
│   ├── TRE-API/
│	├── TRE-UI/
│   ├── Tre-Camunda/
│   ...
├── Submission/
...
Application Structure
Source Apps
Source Apps are the components that you run locally through your .NET IDE (JetBrains Rider on macOS or Visual Studio on Windows) using the DARE-Control Repository.
The Source Apps are mentioned below:
- DARE-API
- Data-Egress-API
- TRE-API
- DARE-FrontEnd
- DARE-Egress-UI
- TRE-UI
- Tre-Camunda
Supporting Apps
Supporting Apps are the infrastructure services required for the Source Apps to run correctly.
These services are started using Docker Desktop via the docker-compose.yml file found in the 5S-TES-Deployment repository.
The Source Apps are mentioned below:
- vault
- seq
- postgres
- openldap
- elasticsearch
- rabbitmq
- keycloak
- phpldapadmin
- orchestration (Camunda)
- adminer-1
- minioTRE
- minioSubmission
- connectors
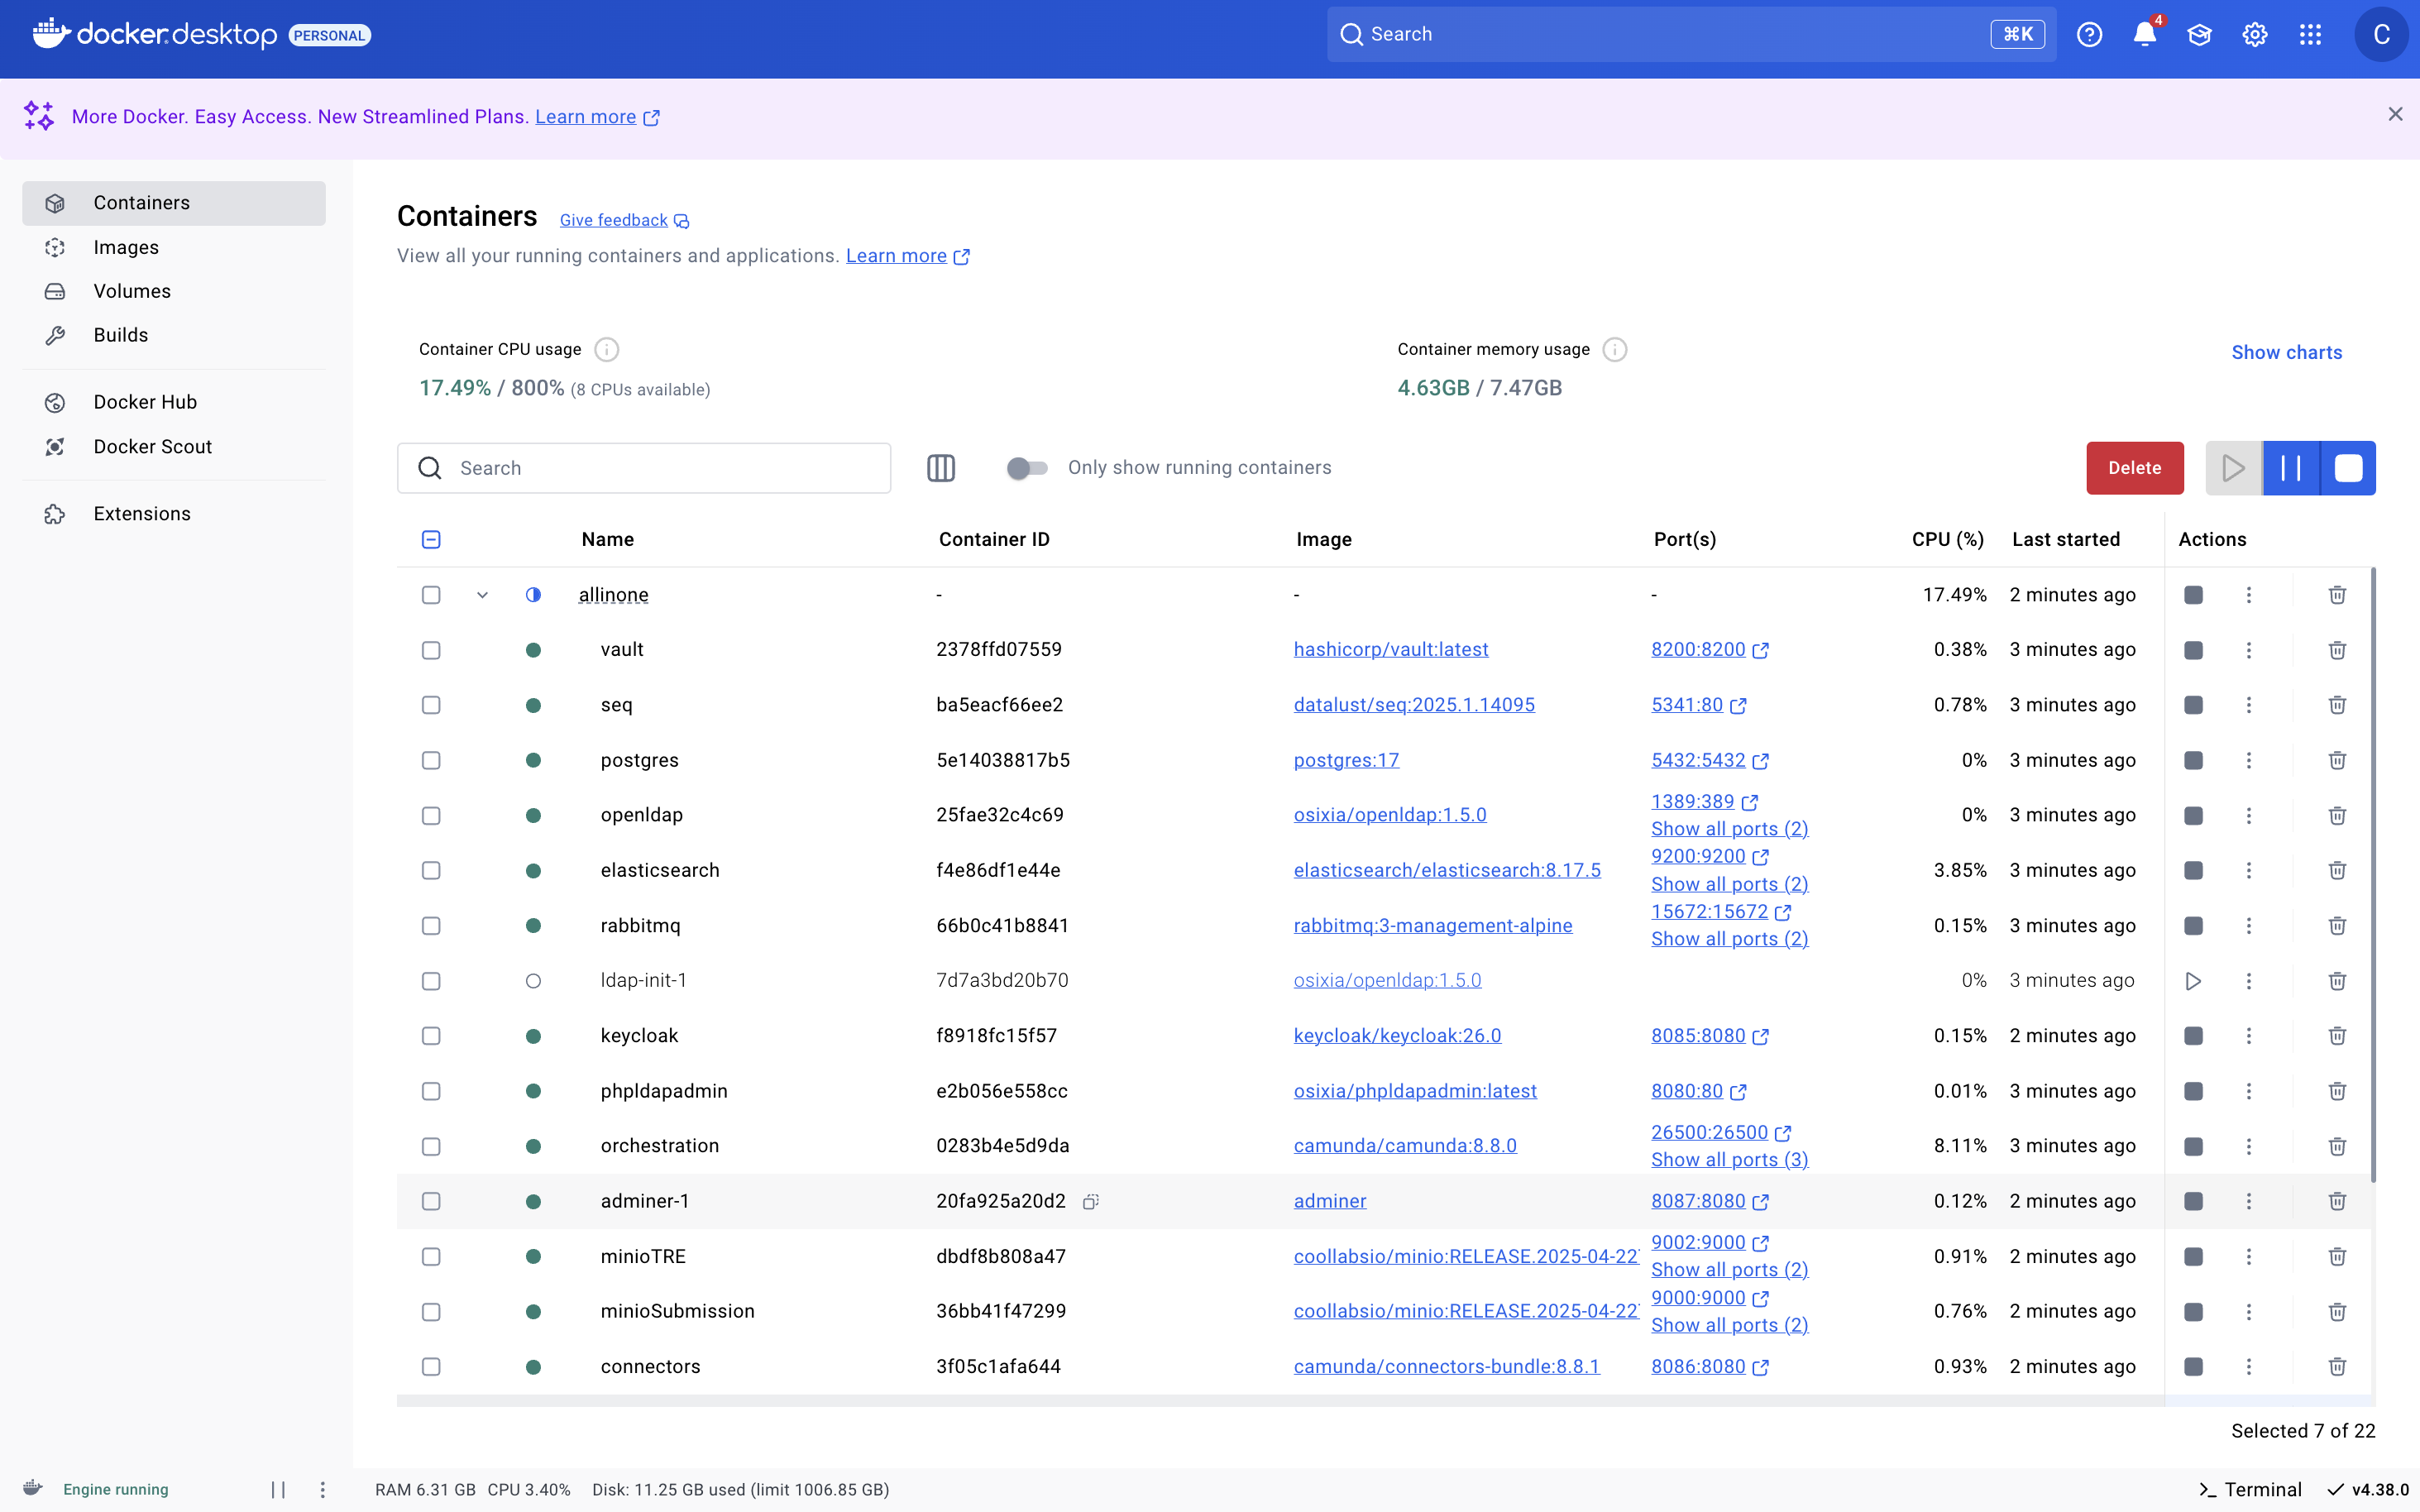
Figure 1: illustrates required Supporting Apps for running 5STES Stack
Instructions for Running the Stack (Dev)
This section provides a overview of how to set up and run Five Safes TES locally in a development environment.
During development, you will:
- Run all Supporting Services using Docker Compose from the all-in-one deployment stack.
- Run the docker compose from AllInOne Stack.
- Clone the 5STES Repository
cd AllInOnedocker-compose up -d- Open the Docker Desktop
- Select all the (Source Apps) and Stop Running it.
- Run the docker compose from AllInOne Stack.
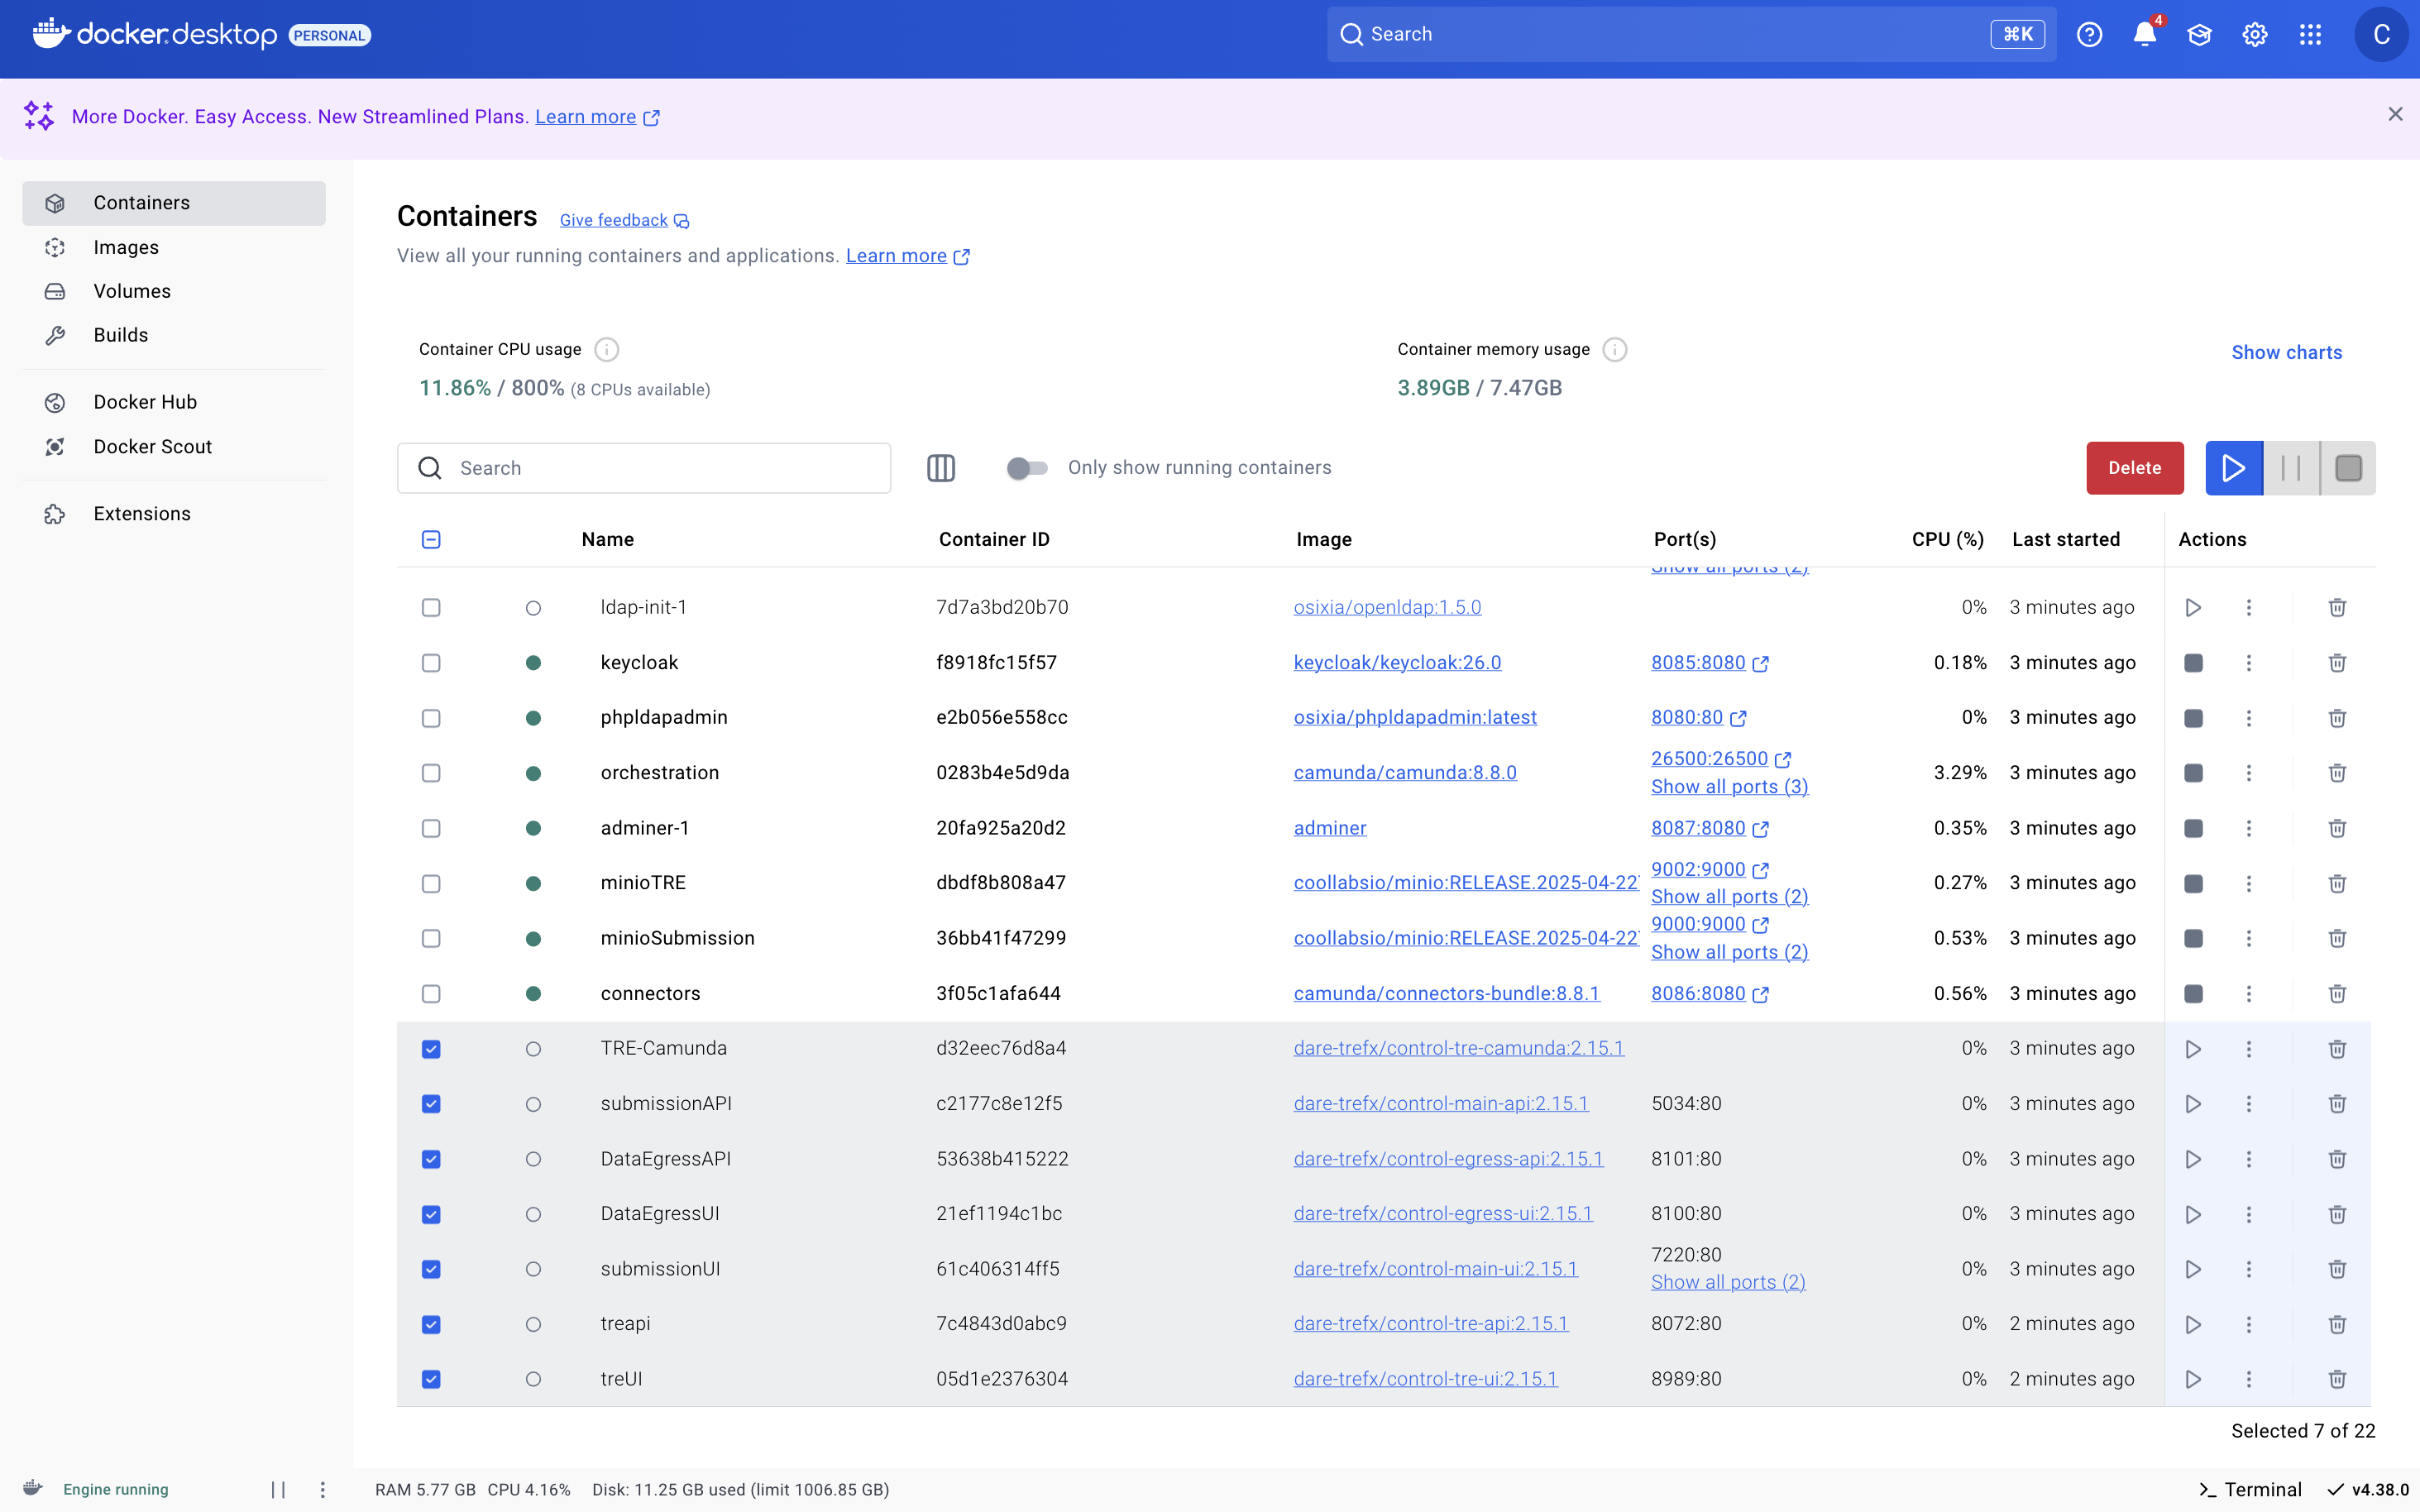
Figure 2: illustrates running the All-In-One Stack excluding the Source Apps.
- Run the main application services (Source Apps) directly from the IDE (Instructions for running the Source Apps are mentioned below).
Instruction for running Source Apps
Source Apps (UI or API) that requires updates See Source Apps.
Before running the real applications locally, you must configure every Source App to use the correct environment profile.
Repeat the following steps for all the mentioned Source Apps See Source Apps.
- Open the DARE-Control Reposiory in the IDE
- Go to the source code directory:
src/ src/→ open the folder of the Source Apps (One by One).- Navigate to: Properties → launchSettings.json
- Inside the
profilessection, locate the"ASPNETCORE_ENVIRONMENT"variable under thehttpprofile. - Change the value from
"ASPNETCORE_ENVIRONMENT": "Development"to"ASPNETCORE_ENVIRONMENT": "Development_Notts"
Each Source App must also use the correct applicationUrl for local Notts development.
You must update this value in the launchSettings.json file for every Source App listed earlier.
-
Open the Source App folder
src/ → <AppName> → Properties → launchSettings.json -
Inside the
"profiles"→"http"section, locate the"applicationUrl"field. -
Change the URL from the default value (example below):
-
Before (Original Code):
"profiles": { "http": { "commandName": "Project", "launchBrowser": true, "launchUrl": "swagger", "environmentVariables": { "ASPNETCORE_ENVIRONMENT": "Development" }, "dotnetRunMessages": true, "applicationUrl": "http://localhost:7163", "comment": "Use http://localhost:5034 for local Notts development" } } -
After (update to Notts local URL) using the comments:
"profiles": { "http": { "commandName": "Project", "launchBrowser": true, "launchUrl": "swagger", "environmentVariables": { "ASPNETCORE_ENVIRONMENT": "Development_Notts" }, "dotnetRunMessages": true, "applicationUrl": "http://localhost:5034", "comment": "Use http://localhost:5034 for local Notts development" } } -
Repeat these steps for all Source Apps to ensure every service runs on the correct local ports.
Make sure you apply both the Environment Change Steps and the Application URL Steps to every app listed under the Source Apps.
This step applies only to the TRE-Camunda application.
-
Navigate to:
src/ → Tre-Camunda → appsettings.json -
Locate the
"ConnectionStrings"section. -
Find the entry named
"CredentialsConnection". -
Update the connection string values as follows:
- Port Change from:
Port=32769toPort=5432 - User Credentials Change from:
User Id=postgres;Password=password123;to
User Id=admin;Password=admin;."ConnectionStrings": { "CredentialsConnection": "Server=localhost;Port=5432;Database=TRE_Credentials;Include Error Detail=true;User Id=admin;Password=admin;", }, - Port Change from:
This configuration upgrade is also applies only to the TRE-Camunda application.
-
Navigate to:
src/ → Tre-Camunda → appsettings.json -
Open the
"ConnectionStrings"section. -
Locate the entry named
TREPostgresConnection. -
Update the connection string values as follows:
- Port Change from:
Port=32769toPort=5432 - User Credentials Change from:
User Id=postgres;Password=password123;toUser Id=admin;Password=admin;.
"ConnectionStrings": { "TREPostgresConnection": "Server=localhost;Port=5432;Database=tredata;Include Error Detail=true;User Id=admin;Password=admin;" }, - Port Change from:
Instead of running each Source App individually, you can create a multi-launch configuration in JetBrains Rider. This allows you to start multiple apps with a single click, greatly improving the development workflow (follow the steps below):
- Open JetBrains Rider.
- At the top-right, select the Run/Debug Configurations dropdown.
- Click Edit Configurations.
- Click the + (Add) button and choose Compound (or “Multirun” if using the Multirun plugin).
- Give the configuration a name (e.g., Dare-Control Multi Start).
- Add each Source App you want to start together:
- TRE-API
- DARE-API
- Data-Egress-API
- TRE-UI
- DARE-FrontEnd
- Data-Egress-UI
- Tre-Camunda
- Save the configuration.
You can now start all selected apps using one run command instead of launching them individually.
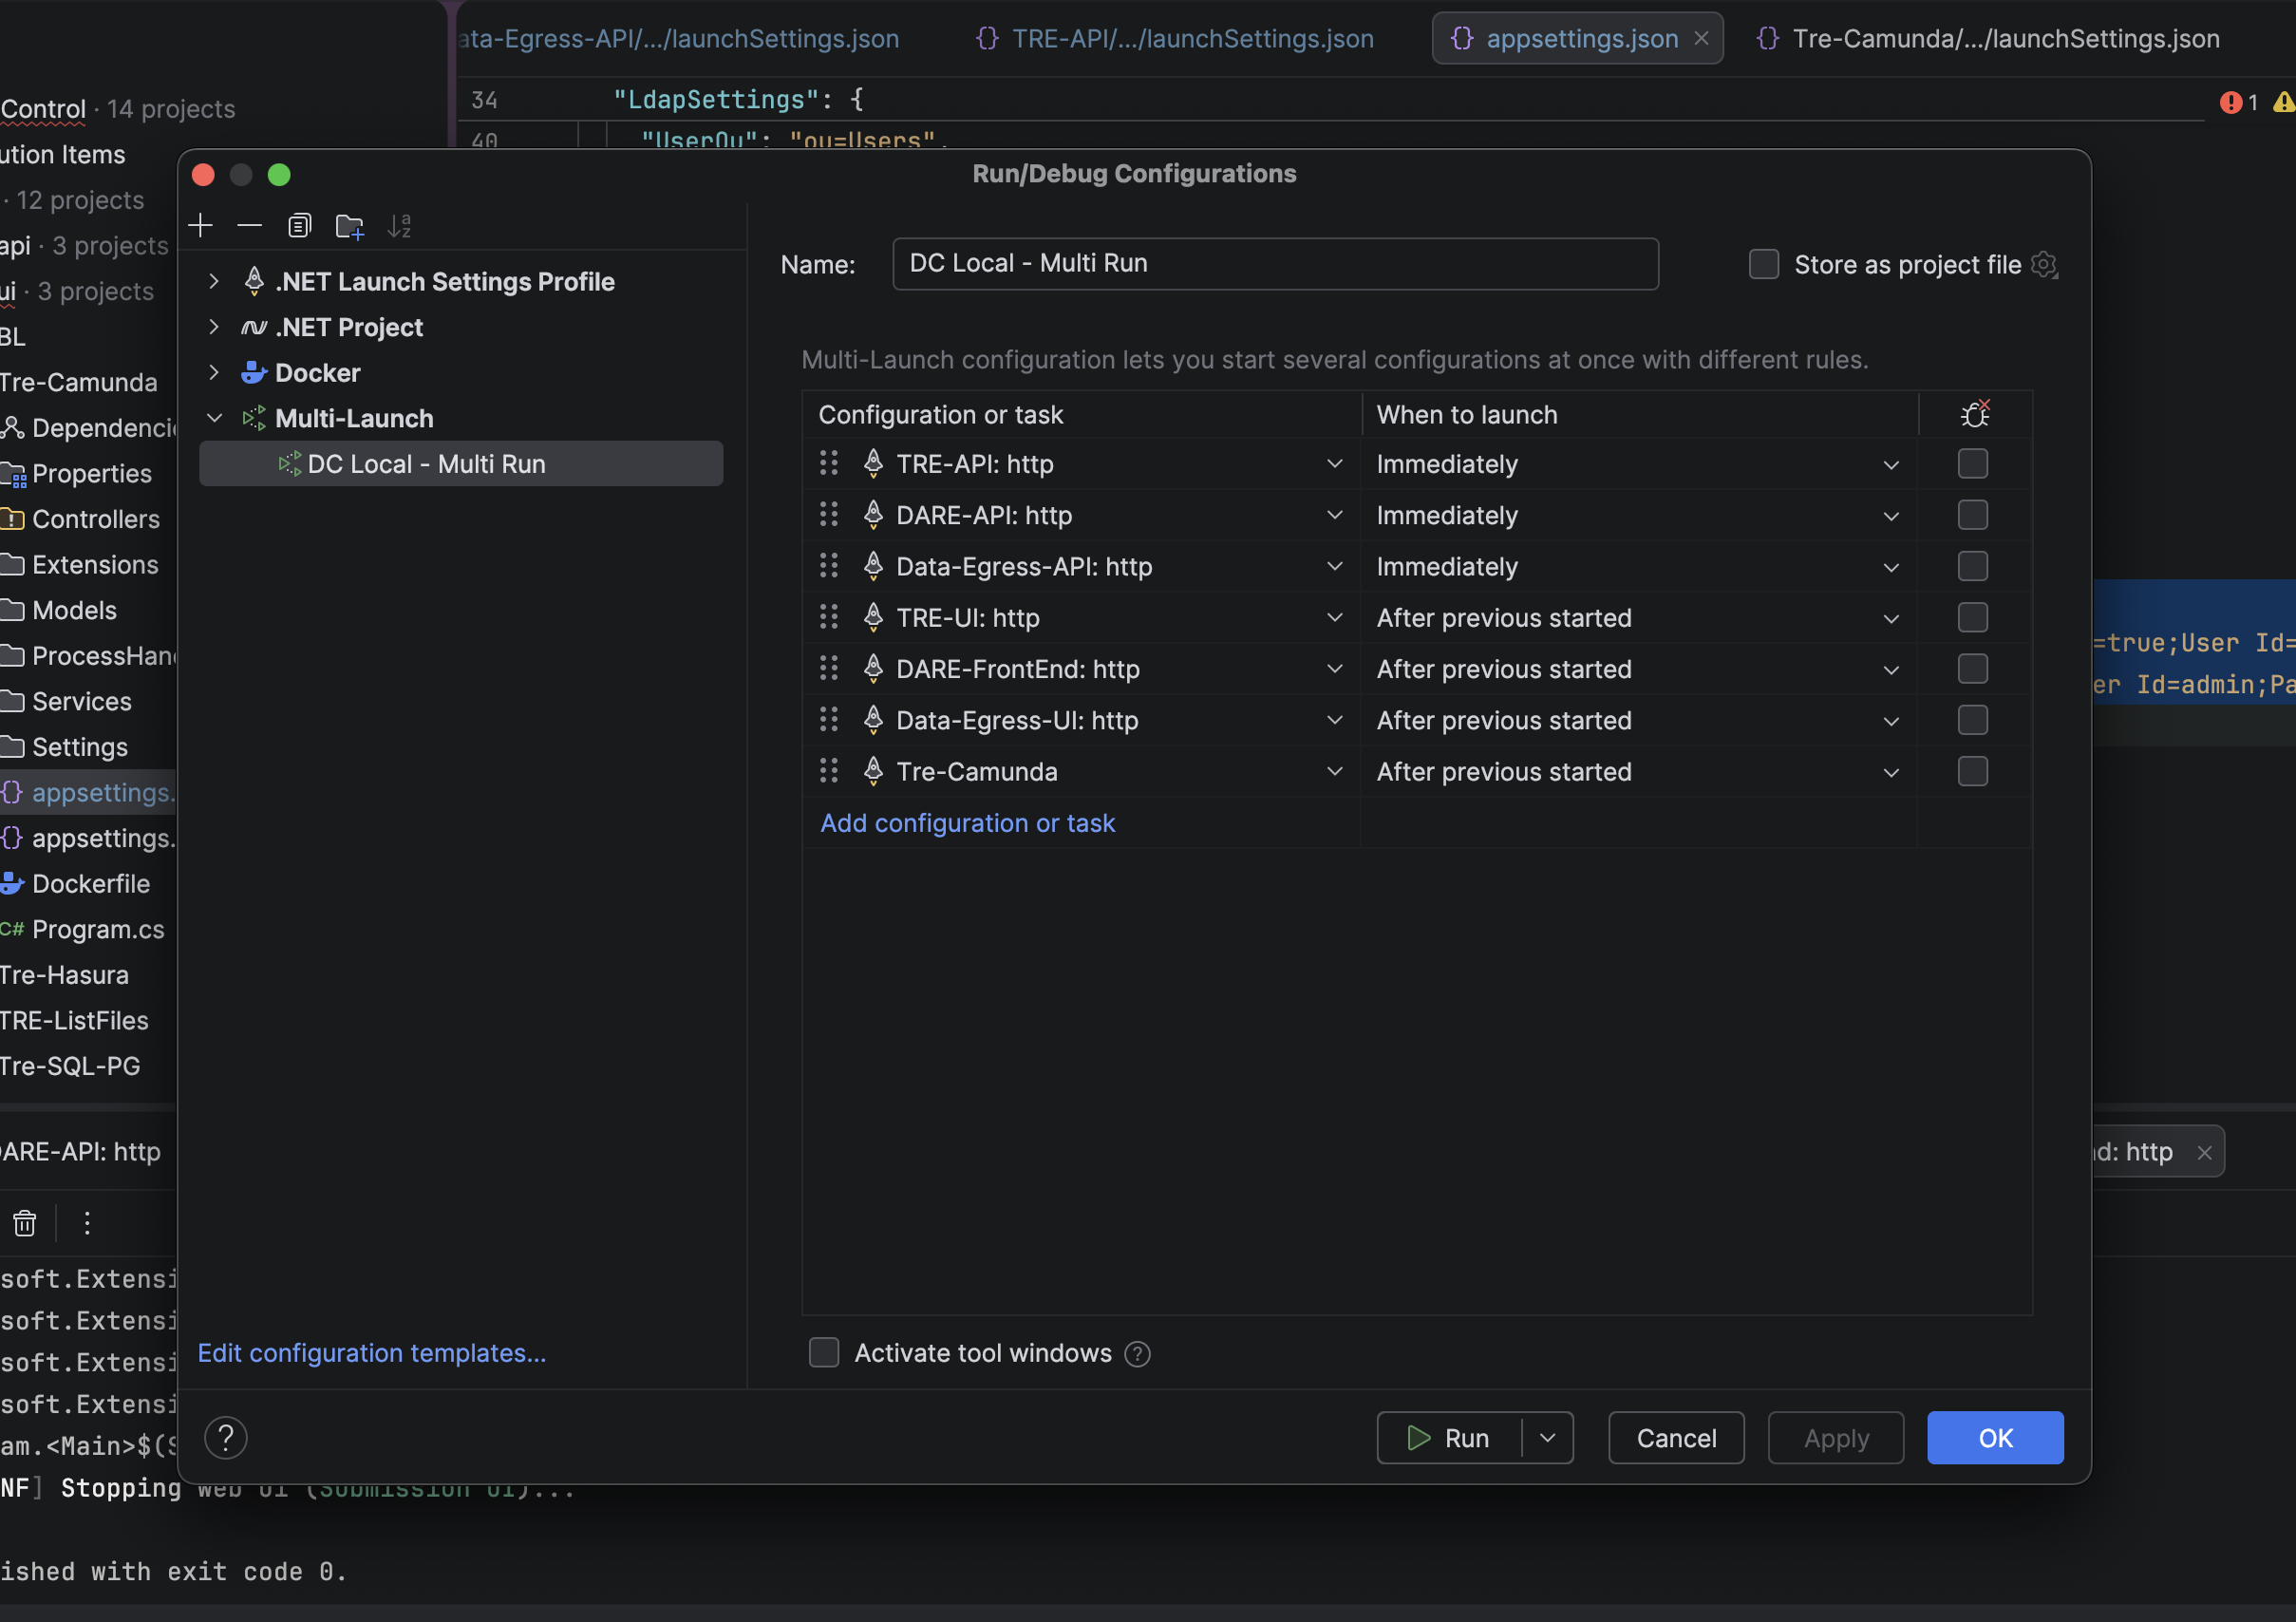
Figure 3: illustrates Multi Launch Step Setup in Rider (IDE)
When creating the Multi-Launch Configuration in Rider, ensure that you add the applications in the correct order. This guarantees that each service starts in the proper sequence when using the multi-launch shortcut.
Running Multi-Launch and Supporting Apps
Once all configurations are complete, you can start the entire development stack using two components:
Run the Supporting Apps (Docker Compose)
- Open the 5S-TES-Deployment repository.
- Navigate to the all-in-one Docker Compose directory.
- Start the docker services:
docker compose up -d - In Docker Desktop, stop any app containers that you plan to run from source See Supporting Apps setup to avoid port conflicts.
Run the Multi-Launch Configuration (Rider)
- Open JetBrains Rider.
- Select the Multi-Launch configuration you created earlier (e.g., Dare-Control Multi Start).
- Click Run (▶️)
This completes the setup. You now have both the source applications and the supporting infrastructure services running together for local development.